In the vast and blocky world of Minecraft, one of the key aspects of gameplay is survival. Whether you’re fending off hostile mobs or embarking on epic adventures, having the right tools and equipment is crucial. Among the arsenal of items at your disposal is the armor stand, a versatile and practical asset that allows you to showcase and organize your protective gear.
Creating an armor stand in Minecraft is a straightforward process that requires only a few simple ingredients. Firstly, gather six sticks by chopping down trees and convert them into wooden planks. Arrange the wooden planks in a crafting table to create a single slab. Next, collect one stone slab by mining stone blocks and smelting them in a furnace. Place the stone slab on top of the wooden slab in the crafting table to produce an armor stand.
Once crafted, the armor stand becomes an essential tool for managing your armor collection. It allows you to store and display various types of armor, such as helmets, chestplates, leggings, and boots. Additionally, the armor stand can be customized with different poses and even equipped with weapons or items.
Step 1: Gather the Required Materials
To make an armor stand, you will need the following materials:
- 6 sticks: Sticks can be obtained by crafting them from wooden planks. Simply place two wooden planks in a vertical pattern in the crafting table to create four sticks.
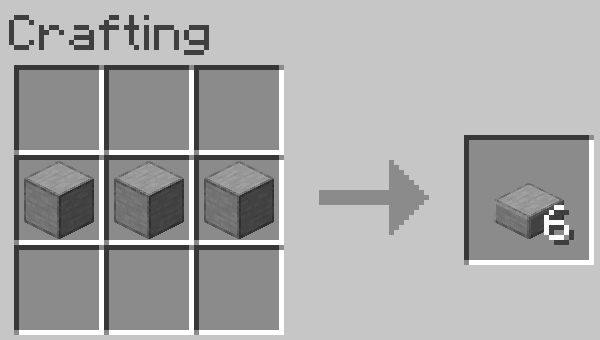
- 1 smooth stone slab: Smooth stone slabs can be created by smelting stone in a furnace. Place stone in the top slot of the furnace and fuel, such as coal, in the bottom slot. Once smelted, you will obtain smooth stone. Place three smooth stones in a horizontal row in the crafting table to create a smooth stone slab.
Step 2: Crafting the Armor Stand
Once you have gathered the required materials, follow these steps to craft an armor stand:
- Open the crafting table: Right-click on a crafting table to open the 3×3 crafting grid.
- Place the materials: In the crafting grid, place the six sticks in the bottom two rows, leaving the middle slot empty. Place the smooth stone slab in the center slot of the top row.
- Retrieve the armor stand: Once you have placed the materials in the correct pattern, you will see the armor stand appear in the result box. Drag it into your inventory.
Step 3: Placing and Customizing the Armor Stand
Now that you have crafted an armor stand, you can place it and customize it to your liking. Here’s how:
- Select the armor stand: In your inventory, select the armor stand and hold it in your hand.
- Choose a location: Decide where you want to place the armor stand in your Minecraft world.
- Place the armor stand: Right-click on the ground where you want to place the armor stand. It will appear as a small stand with arms.
- Customizing the armor stand: Right-click on the armor stand to open the customization menu. From here, you can add and remove armor, weapons, and items, as well as pose the armor stand to suit your needs.
- Adding armor: To add armor to the armor stand, right-click on it with the desired piece of armor in your hand. The armor will appear on the armor stand.
- Removing armor: Right-click on the armor stand while holding the armor piece you want to remove. The armor will return to your inventory.
- Posing the armor stand: Right-click on the armor stand to open the customization menu. Use the arrows on the menu to pose the armor stand in different positions.
Step 4: Creative Uses of Armor Stands
Now that you know how to make and customize an armor stand, let’s explore some creative uses for them:
- Displaying armor: Armor stands are a great way to showcase your collection of armor sets. You can create themed displays or simply showcase your most impressive sets.
- Weapon displays: Place weapons on the armor stand to create an armory or display your favorite weapons.
- Item storage: Armor stands can be used to store items in a visually appealing way. You can place tools, potions, or other items on the stand for easy access.
- Decoration: Armor stands can be used to add decorative elements to your builds. Pose them in different positions to create dynamic scenes or use them as statues.
- Adventure maps: If you enjoy creating adventure maps in Minecraft, armor stands can be used to add interactive elements to your maps. You can create puzzles or challenges that involve manipulating armor stands.
Conclusion,
Making an armor stand in Minecraft is a relatively simple process that adds a lot of customization options to your gameplay. By following the steps outlined in this article, you can create and customize armor stands to display and store your armor, weapons, and items. Let your creativity shine as you experiment with different poses and uses for your armor stands in the vast world of Minecraft.


![Shadow Fight Shades MOD APK[Unlimited Gems, God Mode]v1.3.2](https://apkshub.in/wp-content/uploads/2024/04/Shadow-Fight-Shades-MOD-APKUnlimited-Gems-God-Modev1.3.2-1-75x75.webp)


